此前使用存储桶 + CDN 的方式完成博客构建,
如今购置了云服务器并已完成 ICP 备案,便考虑把博客迁移到服务器上。
服务器设置
防火墙
先使用 UFW 完成防火墙设置(UFW 比 iptables 更易于理解和使用)
 1
 2
 3
 4
 5
 6
 7
 8
 9
10
11
12
13
14
15
16
|
# sudo iptables -A INPUT -p tcp --dport 443 -j ACCEPT
sudo ufw enable
sudo ufw allow ssh
sudo ufw allow 'Nginx Full'
sudo ufw reload

sudo ufw status   # 查看当前防火墙状态和规则
---
Status: active

To                         Action      From
--                         ------      ----
22/tcp                     ALLOW       Anywhere
Nginx Full                 ALLOW       Anywhere
22/tcp (v6)                ALLOW       Anywhere (v6)
Nginx Full (v6)            ALLOW       Anywhere (v6)
|
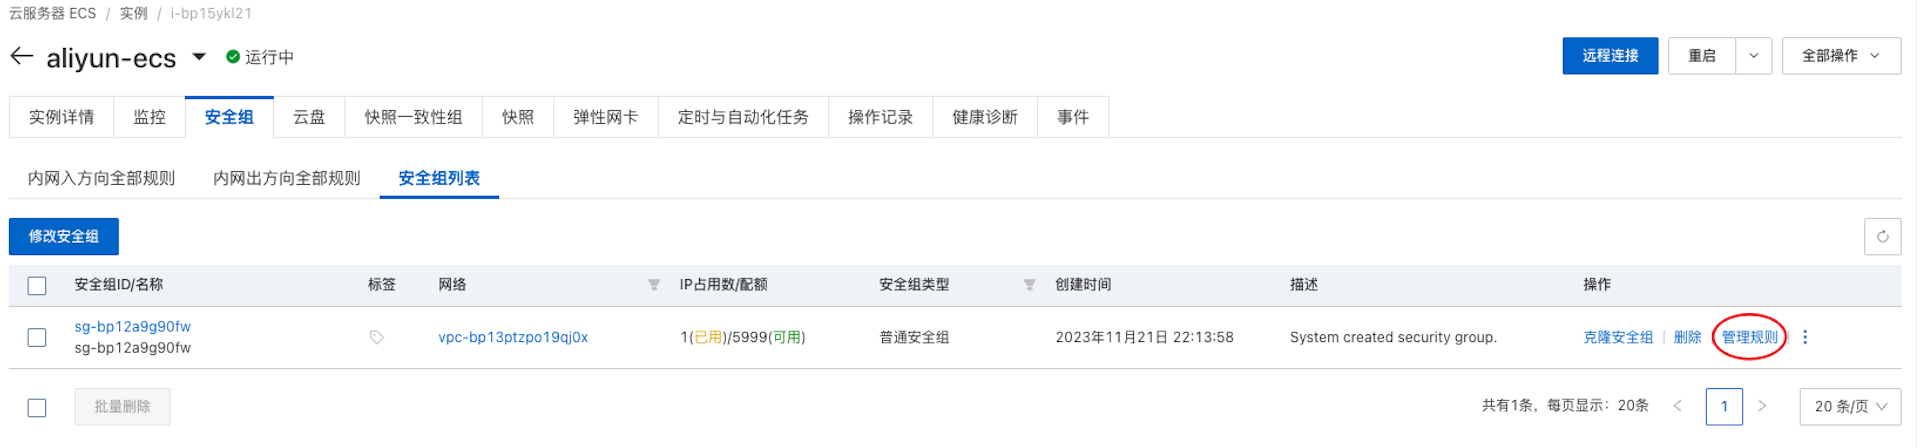
阿里云安全组
进入 云服务器控制台,找到对应实例,点击安全组 -> 管理规则
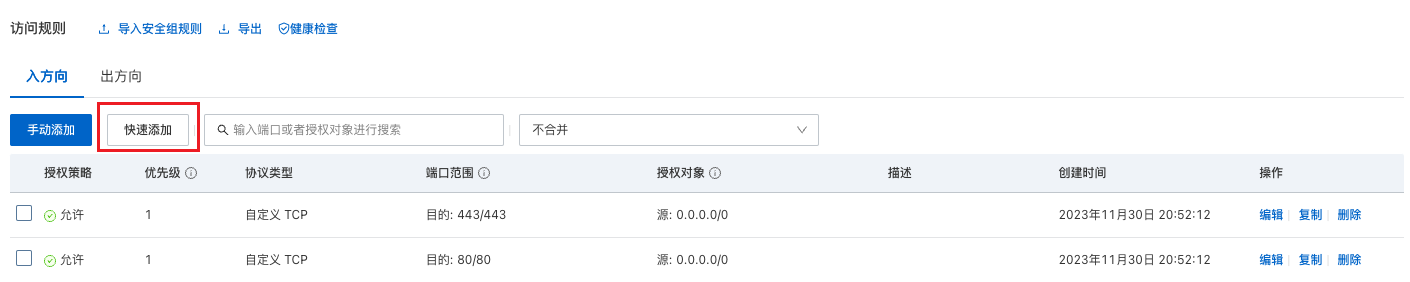
快速添加 -> 选择 HTTP(80) 和 HTTPS(443)
博客部署
Nginx 配置
使用 systemctl 管理 Nginx 服务
1
2
3
4
5
6
7
|
systemctl start nginx
systemctl enable nginx    # 设置 Nginx 服务开机自启动
systemctl status nginx
systemctl restart nginx   # 重启

# 查看进程信息
ps -ax | grep nginx
|
服务配置
1
2
|
cd /etc/nginx/sites-available/
sudo vim blog.conf
|
HTTPS 监听 443 端口,选择开启 HTTP2,并修改默认加密算法,最后添加 HTTP 请求的自动跳转。
 1
 2
 3
 4
 5
 6
 7
 8
 9
10
11
12
13
14
15
16
17
18
19
20
21
22
23
24
25
26
27
28
29
30
31
32
33
34
35
|
server {
        listen       443 ssl http2;  # 监听443端口
        server_name  alfly.cn www.alfly.cn;
        # SSL证书和私钥,通过域名服务商获得,然后上传到 /etc/nginx 目录
        ssl_certificate      alfly.cn_bundle.crt;
        ssl_certificate_key  alfly.cn.key;
        ssl_session_cache    shared:SSL:1m;
        ssl_session_timeout  5m;
        # ssl_ciphers  HIGH:!aNULL:!MD5;
        ssl_ciphers EECDH+CHACHA20:EECDH+AES128:RSA+AES128:EECDH+AES256:RSA+AES256:EECDH+3DES:RSA+3DES:!MD5;
        ssl_prefer_server_ciphers  on;

        location / {
            # 网站静态文件存储的绝对位置,nginx 通过此路径访问
            root   /var/www/mysite/public;
            index  index.html index.htm;
        }
}

# HTTP 请求自动跳转 HTTPS
server {
       listen         80;
       listen    [::]:80;
       server_name    alfly.cn www.alfly.cn;
       return         301 https://$server_name$request_uri;
}
#server {
#    listen 80;
#    server_name alfly.cn www.alfly.cn;
#    # 将所有 HTTP 请求通过 rewrite 指令重定向到 HTTPS
#    rewrite ^(.*)$ https://$host$1;
#    location / {
#        index index.html index.htm;
#    }
#}
|
为了确保 Nginx 用户在运行时有权限访问网页文件,把文件放在 /var/www/ 目录下,放在其他目录下需要修改目录的权限。
1
2
3
4
|
sudo chmod 0755 /your/path/to/www

# /var/www 权限不够时,可更改目录及子目录的所有者为当前用户
sudo chown -R $USER:$USER /var/www
|
也可直接修改配置文件 /etc/nginx/nginx.conf 中的用户 www-data 为 root,但不推荐
通过执行以下命令让网页生效
1
2
3
4
5
|
# 添加软连接(sites-available/default 里有介绍这样的设计原因)
sudo ln -s /etc/nginx/sites-available/hugo.conf /etc/nginx/sites-enabled/

nginx -t          # 验证配置文件格式
nginx -s reload   # 重新加载配置文件(每次更改配置后都需要执行)
|
内容发布
在博客项目目录下执行 hugo 会自动生成网页内容至 /public 目录,将整个目录上传至远程服务器 /var/www/mysite 下即可。
1
2
|
hugo --cleanDestinationDir
rsync -aAXv ./public user@remote:/var/www/mysite --delete
|
我们可以设置 .git/hooks 把这个脚本绑定在 git push 操作前,注意不要忘记添加执行权限。
没有 post-push,而且一般 pre-push 是用作检测 remote 状态
1
2
3
4
5
6
7
8
|
$ cat .git/hooks/pre-push
#!/bin/sh
# run bash script before git push

# deploy to server
./script/deploy.sh

$ chmod +x .git/hooks/pre-push
|
测试
重定向测试
访问 http 返回 301 Moved Permanently,响应头的字段 Location 指明后续要跳转的 URL,浏览器会自动重定向至新的 URL。
 1
 2
 3
 4
 5
 6
 7
 8
 9
10
11
12
13
14
15
16
|
~ > curl -i alfly.cn
HTTP/1.1 301 Moved Permanently
Server: nginx/1.18.0 (Ubuntu)
Date: Tue, 12 Dec 2023 03:28:17 GMT
Content-Type: text/html
Content-Length: 178
Connection: keep-alive
Location: https://alfly.cn/

<html>
<head><title>301 Moved Permanently</title></head>
<body>
<center><h1>301 Moved Permanently</h1></center>
<hr><center>nginx/1.18.0 (Ubuntu)</center>
</body>
</html>
|
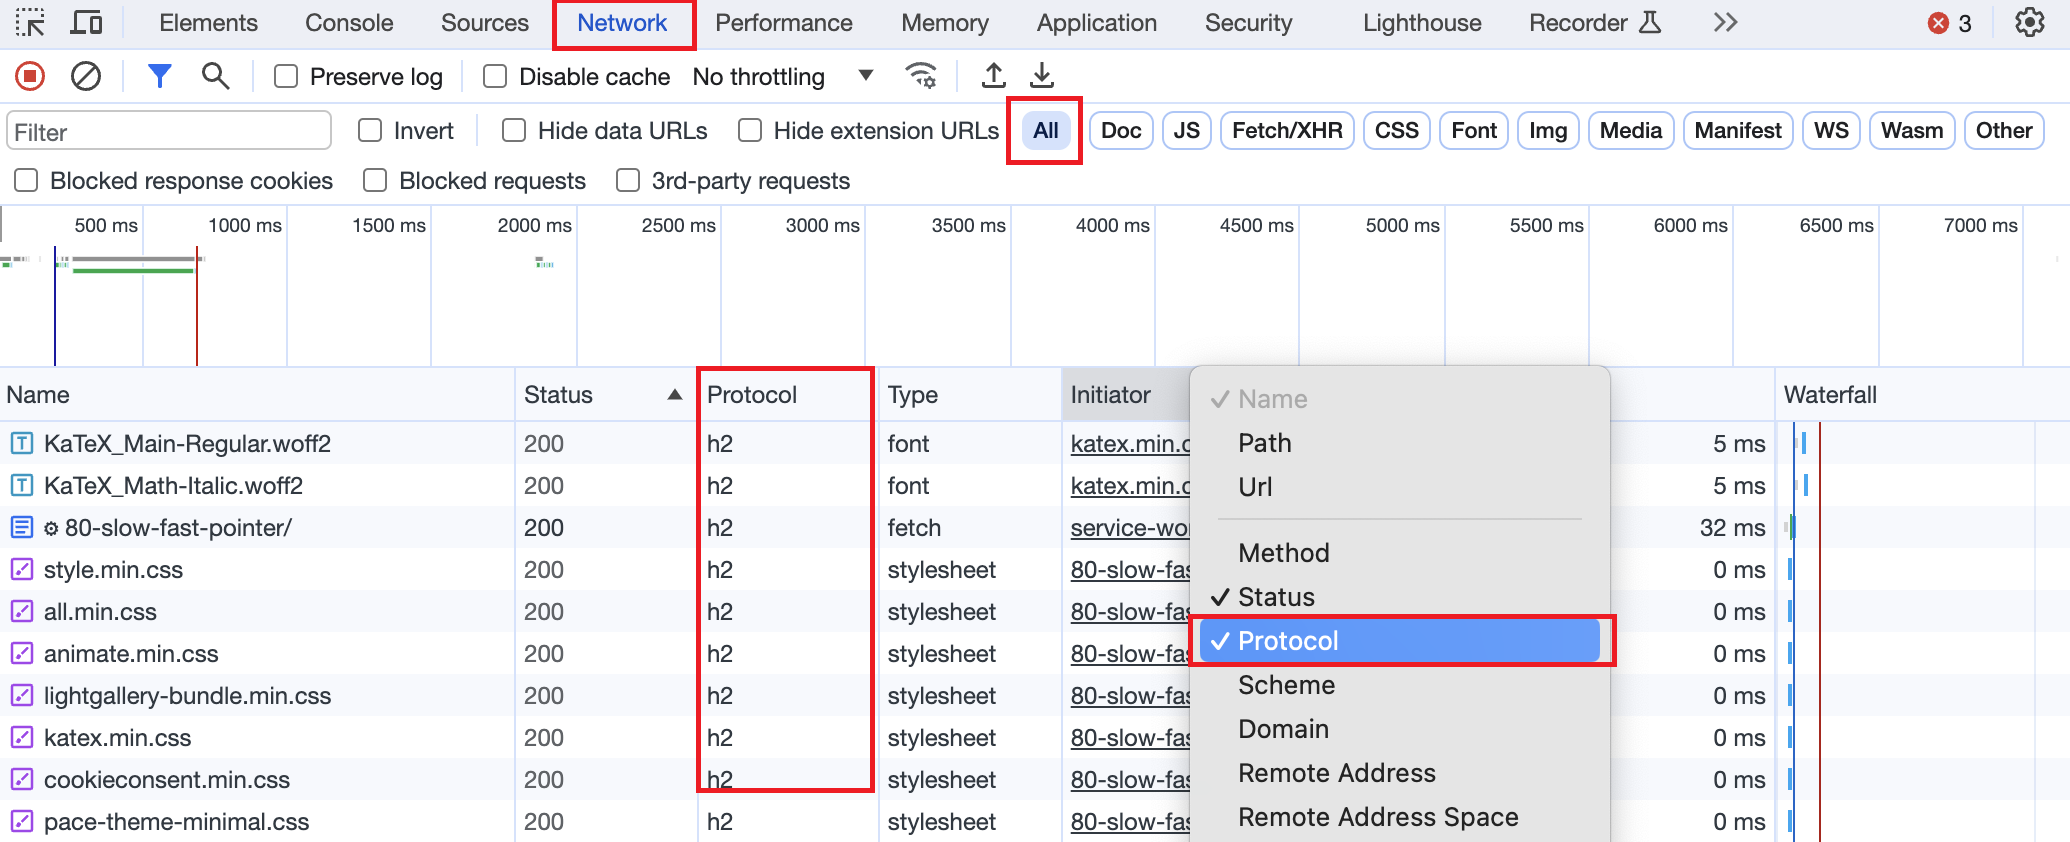
HTTP 协议版本检测
鼠标右键,选择检查 (inspect) 选项打开开发者工具,或 cmd + shift + c,选项面板 Network -> All。
Chrome 浏览器默认不显示 http 版本,在信息栏右键勾选 Protocol,刷新网站页面,则可看到协议版本为 h2。
当然也可以通过其他工具进行检测,如 在线 HTTP2 检测网站
Reference


