Git 简介
基本逻辑
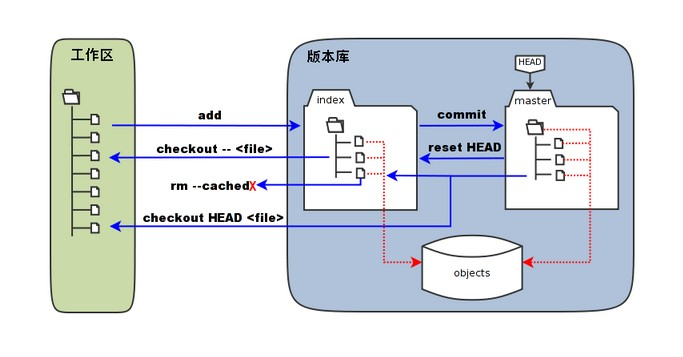
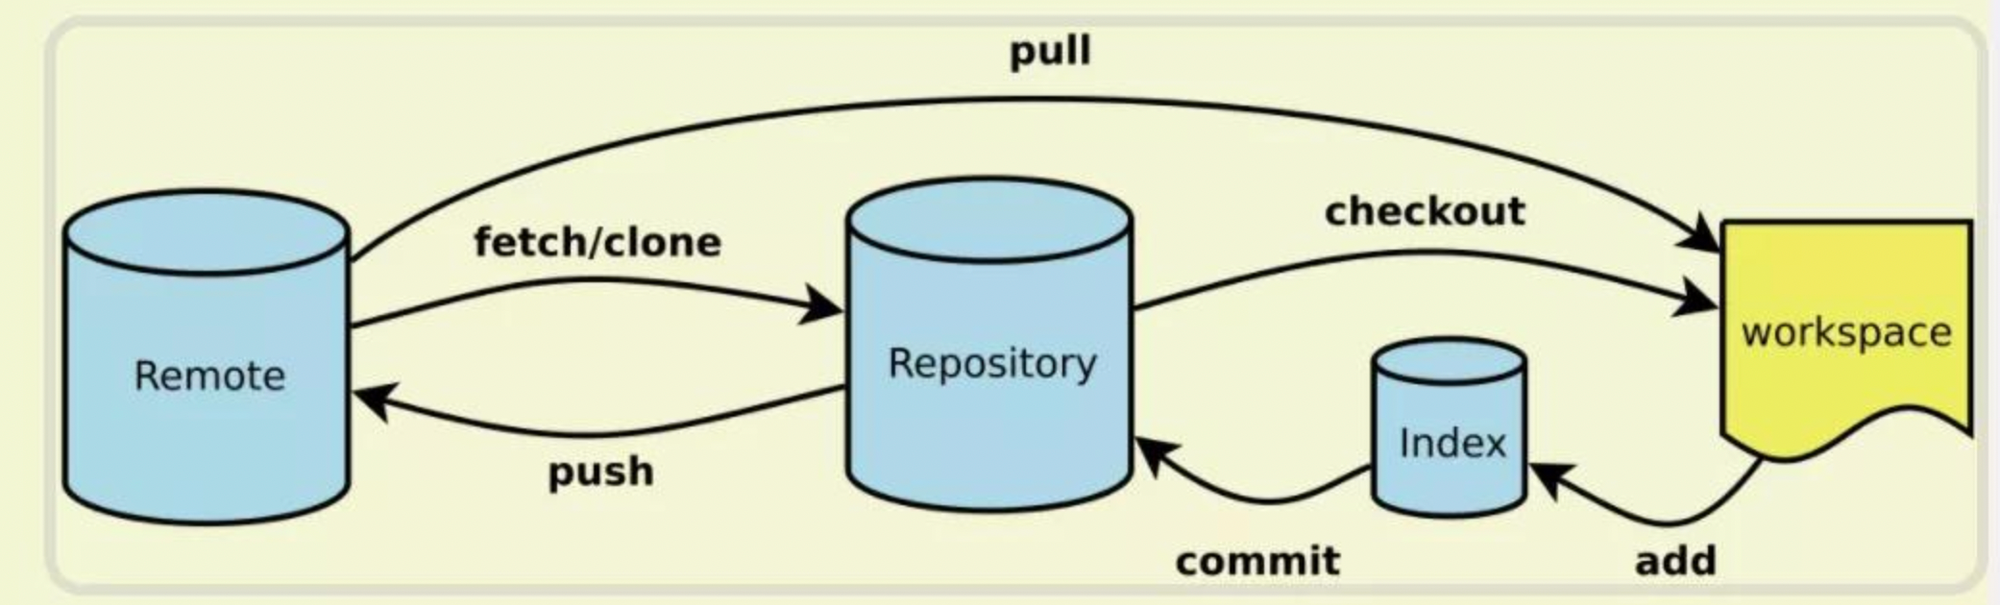
Git 工作区、暂存区和版本库的概念,可看 相关介绍。
基本操作
本地仓库
1
2
3
4
5
|
git clone --shallow     # 浅克隆(shallow clone),不包括完整的版本历史信息
# add and commit
git add -p <file name>  # -p 分块交互式暂存
git add . && git commit -m "initial commit"
git commit --amend
|
远程仓库
 1
 2
 3
 4
 5
 6
 7
 8
 9
10
11
12
|
### 提交代码
git push origin main[:main]  # git push <remote> <local branch>:<remote branch>
git --set-upstream-to=origin/main # bind remote branch with local
git push

### 拉取代码
# fetch 将获取远程仓库中的新提交,并将其保存在本地的远程跟踪分支中,不改变工作区
# merge 将远程跟踪分支合并到当前分支
git fetch; git merge

# pull 先执行 git fetch,然后自动执行 git merge(默认)
git pull origin main [--merge]
|
使用 git fetch 可以查看远程仓库的更新情况,在合适的时候决定是否将这些更新合并到本地分支。
这样可以避免意外的合并冲突或不必要的更改,同时也提供了更大的灵活性。
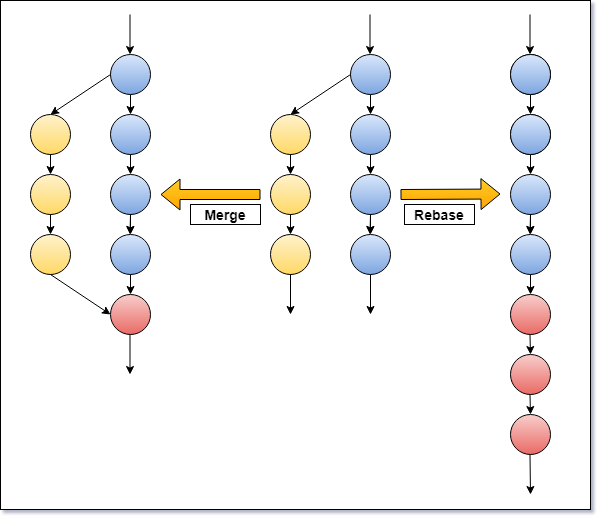
上述拉取代码合并的方式会创建一个新的合并提交,而使用 rebase 会看起来是在目标分支的最新提交上进行更改。
- 希望保留分支的历史记录并明确显示合并点,可以选择
merge
- 希望提交历史保持线性,清晰地展示你的更改,可以选择
rebase
1
2
3
4
|
# git fetch 后执行 git rebase
git pull origin main --rebase
# 冲突解决并 add 修改后
git rebase --continue
|
rebase 的历史改写特性也可能导致冲突或其他问题,在对公共分支(如 main)进行 rebase 操作时,应该特别小心,以避免破坏其他人的工作或引入冲突。
Local 常用操作
查看变更/历史
 1
 2
 3
 4
 5
 6
 7
 8
 9
10
11
12
13
14
15
16
17
18
19
20
21
22
23
24
|
git status

# 工作区与暂存区 diff
git diff
# 暂存区与最新本地版本库(本地库中最近一次commit的内容)
git diff --cached  [<path>...]
# 工作区与指定commit-id的差异
git diff commit-id  [<path>...]
# 两个 commit 的差异
git diff commit-id-a commit-id-b [<path>...]
# 查看本地分支和远程分支
git diff remotes/origin/main main

# commit history
git log        # 显示历史日志
git log -p -2  # 近2次,显示 patch(diff)
git log --oneline --stat  # 简略文件更改信息统计
git reflog     # 更详细,每次 amend 的内容有记录
git log --all --graph --decorate --oneline # 可视化历史记录(有向无环图

# 内容历史
git blame <file name> | grep 'code' # 查看最后修改某行的人
git show <commit-id>        # 查看 commit 内容
git show <commit-id> --stat # 查看 commit 变更的文件列表
|
分支 branch
1
2
3
4
5
6
7
8
|
# 查看
git branch -vv  # local 显示commit信息(very verbose)
git branch -r   # 查看远程分支
git branch -a   # 查看所有分支

# 新建
git branch <new_branch>; git checkout <new_branch>  # create and switch
git checkout -b <new_branch>
|
暂存、撤销、回退
 1
 2
 3
 4
 5
 6
 7
 8
 9
10
11
12
13
14
15
16
17
18
19
20
21
22
23
24
25
26
27
|
# 暂存当前进度
git status
git stash save 'message...'  # 添加一些注释
git stash list  # 显示保存进度的列表
git stash pop

# 撤销 add,不更改文件(暂存区 -> 工作区)
git reset <filename>

# 文件恢复(暂存区 替换 工作区)
git checkout -- <filename>
# 若已经 add 需要先
git reset HEAD -- <filename>

# 回退
git checkout <commit-id>   # 更改 HEAD 指向,更新工作区,查看历史 commit 代码
git checkout <tag-id>
# 返回最新分支
git checkout master
git checkout -             # 之前处于分离头状态(detached HEAD),切换回上一个分支或提交
                           ## HEAD (no branch)

git checkout HEAD .        # HEAD 指向内容 替换 现在的工作区和暂存区

# 回退上一版本(撤销 commit)
git reset --hard HEAD^     # 改变本地工作区(代码丢弃)
git reset --soft HEAD^
|
取消 track 文件
1
2
3
4
5
6
7
|
# 列出 master 分支下跟踪的文件
git ls-tree -r master --name-only

# 删除已经 add 的内容(本地保留)
git rm -r --cached output/*
# 删除文件(包含本地!!!)
git rm -r *
|
别名 alias
1
2
3
4
5
6
|
vim ~/.gitconfig

[alias]
	graph = log --all --graph --decorate --oneline

-> git graph
|
子模块 submodule
 1
 2
 3
 4
 5
 6
 7
 8
 9
10
11
12
13
14
|
# 添加 submodule
git submodule add <url> <submodule_path>

# 初始 git clone 的工程中带有 submodule 时并不会自动下载,此时下载可以
git submodule init
git submodule update
# 一个命令完成
git submodule update --init --recursive

# 去除 submodule
rm -rf submodule_path     # 子模块目录及源码
vi .gitmodules            # 项目目录下 .gitmodules 中相关条目
vi .git/config            # 配置项中子模块相关条目 git config --remove-section submodule.<submodule_path>
rm .git/module/submodule_name   # 模块下的子模块目录
|
忽略文件 gitignore
项目中不是所有的文件都需要放进仓库(如 data/*),设置 ignoring files 指定不需要 track 的文件类型。
具体内容可参考 .gitignore 文件样例。
 1
 2
 3
 4
 5
 6
 7
 8
 9
10
11
12
13
14
15
16
17
|
# 单个仓库设置
cd project_folder
echo 'output/*' >> .gitignore

# 全局设置(所有仓库)
vim ~/.gitignore_global
git config --global core.excludesfile ~/.gitignore_global

# .gitignore只能忽略那些原来没有被track的文件
# 如果某些文件已经被纳入了版本管理中,则修改.gitignore是无效的
# 需要先把本地缓存删除(改变成未track状态),
git rm --cached <file_name>

# 更新 track
git rm -r --cached .
vim .gitignore
git add . && git commit --amend
|
tag 标签
 1
 2
 3
 4
 5
 6
 7
 8
 9
10
11
12
13
14
15
|
# 创建标签
git tag -a <tagname> [commit] [-m <msg>]
# git tag -a v1.0 abcd1234 -m "Version 1.0 release"

# 查看
git show tagname
git tag                 # 查看所有标签

# 推送标签到远程仓库
git push origin tagname
git push origin --tags  # 所有标签

# 删除标签
git tag -d tagname      # 本地
git push origin :refs/tags/tagname # 远程
|
commit 时间修改
1
|
git commit --amend --no-edit --date="2022-01-01 10:30:00"
|
常用场景
撤销 commit amend
1
2
3
4
5
6
7
|
$ git reflog
c135a6c (HEAD -> master) HEAD@{0}: commit (amend): xxx
371ba40 (origin/master, origin/HEAD) HEAD@{1}: xxx

$ git reset HEAD@{1}
$ git add .
$ git commit -m 'new commit'
|
分支合并
1
2
3
4
5
6
7
8
9
|
git merge <branch>  # merge branch and HEAD
git merge --abord

# 若有冲突,编辑冲突文件
vim <conflict_file>

# 解决冲突后
git add <conflict_file>
git merge --continue
|
fork 同步更新原项目
 1
 2
 3
 4
 5
 6
 7
 8
 9
10
11
12
13
14
|
git remote add upstream https://github.com/original/repo.git

# 确认添加状态,多出两个upstream
git remote -v

# 从上游仓库 fetch 分支和提交点到本地,存储于本地分支 upstream/master
git fetch upstream
git branch -a

# 切换到本地主分支,merge
git checkout master
git merge upstream/master

git push origin master
|
更改某次提交内容
如果某个功能点相关的改动只生成一个 commit,将极大的简化功能点在分支间的移动工作,现在发现之前的 commit 功能不完整,如何更改这次提交内容呢
 1
 2
 3
 4
 5
 6
 7
 8
 9
10
11
12
13
14
15
16
17
|
# git rebase -i 交互式变基
# 找到需要更改的 commit-id(rebase 其父提交^), 将行首的 pick 改成 edit 后保存
git rebase <commit-id>^ --interactive

vim file # change file

git add .
git commit --amend
git rebase --continue

# 若有冲突,编辑冲突文件
vim <conflict_file>

# 解决冲突后
git add <conflict_file>
git commit --amend
git rebase --continue
|
如何把当前改动追加到这次 commit 上呢
 1
 2
 3
 4
 5
 6
 7
 8
 9
10
11
|
git stash # 保存改动

git rebase <commit-id> --interactive # git rebase -i 交互式变基

git stash pop # change file

git add .
git commit --amend
git rebase --continue

# 若有冲突,解决冲突同上
|
查找提交内容
- blame
- 一起显示更改内容和 commit 信息的方法
 1
 2
 3
 4
 5
 6
 7
 8
 9
10
11
|
git log -S <string> # 字符串匹配
git log -G <regex>  # 正则匹配

# 查看具体用法
git help log

# 得到含有相关修改内容的 commit 后,查看提交内容
git checkout <commit-id>
git checkout master

git show <commit-id>
|
Remote 设置
初始设置 & 新建仓库
参考 官方文档 完成初始化操作,当然也可不适用命令行,直接在网页上新建仓库。
 1
 2
 3
 4
 5
 6
 7
 8
 9
10
11
12
13
14
15
16
|
# github CLI login
gh auth login

# create a repo
git init -b main

# 使用 github CLI 创建远程仓库
gh repo create --source=. --private

# 手动创建
git remote add orgin https://github.com/aaa/xxx.git

# config
git config --global  --list
git config --global user.name "alfly"
git config --global user.email alfly0023@gmail.com
|
ssh/https 切换
选择不同的远程连接方式,完成相关 配置。
 1
 2
 3
 4
 5
 6
 7
 8
 9
10
11
|
# add ssh key
cat ~/.ssh/id_rsa.pub

# validate
ssh -T git@github.com

# check
git remote -v

# change to ssh
git remote set-url origin git@github.com:Alfly/Tai-e-assignments.git
|
SSH 连接设置
mac 配置 (已备份至 dotfiles-local)
1
2
3
|
# 22 端口默认关闭
sudo systemsetup -getremotelogin
sudo systemsetup -setremotelogin on
|
在 HTTPS 端口使用 SSH
 1
 2
 3
 4
 5
 6
 7
 8
 9
10
11
12
13
14
|
vi ~/.ssh/config
# switch to port 443 -> [ssh.github.com]:443
# ssh -T [-p 22] git@github.com
# ->
# ssh -T -p 443 git@ssh.github.com
Host github.com
  Hostname ssh.github.com
  Port 443
  User git
  IdentityFile /Users/lfe/.ssh/id_rsa
  TCPKeepAlive yes
  PreferredAuthentications publickey
  # socks5 proxy here is not working
  # ProxyCommand nc -x localhost:7891 -X 5 %h %p
|
Linux 服务器 github SSH 配置代理 (todo: 备份至 dotfiles-local)
 1
 2
 3
 4
 5
 6
 7
 8
 9
10
11
12
13
14
15
16
17
|
$ vi ~/.ssh/config
--------------------
ProxyCommand connect -S xxx.xxx.xx.xx:7890  -a none %h %p

Host github.com
  User git
  Port 22
  Hostname github.com
  IdentityFile "/home3/lfe/.ssh/id_rsa"
  TCPKeepAlive yes

Host ssh.github.com
  User git
  Port 443
  Hostname ssh.github.com
  IdentityFile "/home3/lfe/.ssh/id_rsa"
  TCPKeepAlive yes
|
Todo
-
git mergetool:使用工具来处理合并冲突
-
git bisect:通过二分查找搜索历史记录
-
git cherry-pick:选择性地将一个或多个提交应用到当前分支
Reference
